Valid IP: Key Tips for Checking and Validating Your Network
If you work on the computer using the internet connectivity on a Windows 10-operated system, there’s no doubt you may come across the error “Ethernet doesn’t have a valid IP configuration,’ while many of us may get confused as to what to do next, there is an easy way out.
In the next paragraphs, we’ll look into this error, its possible causes, and quick solutions. And most importantly, you can solve this problem right at your home without any need of calling a technician. However, we recommend you read the full article first before you start diagnosing and troubleshooting the problem.
What is “Ethernet doesn’t have a valid IP configuration Error”?
This error reflects the simple error that your IP fails to get connected to the ISP. You will mostly see this error in Windows 10-operated system. It also reflects some errors on the part of your configuration procedure.
When you connect your system to the internet, the Ethernet connection receives a valid request from the DHCP (Dynamic Host Configuration Protocol), if it doesn’t, the error message will be displayed on your screen.
When Will You Come Across “Ethernet doesn’t have a valid IP configuration Error Occur”?
There are multiple reasons why you may come across this error. Primarily, you have to check your NIC or Network Interface Card. If there is an error in the NIC, you will see the error. Other problems may be related to the internet device, computer software programming errors, Network adapter setting mistakes, and many others.
[Read more: How to Turn Off and Disable Avast Antivirus?]
How To Fix The Error —Ethernet doesn’t have a valid IP configuration?
We’ve now come to the most important segment of the article that what should a user do when he gets the Ethernet doesn’t have a valid IP configuration error on the screen.
As we briefly looked into some of the possible causes behind the errors, similarly you have to try some basic fixes first to see if you can connect your system to the internet now. If these basic fixes don’t work, you should look into the other quick solutions as we mention below.
1. Restart your Computer and Disable Fast Startup
The problem may have its roots in your fast startup feature, get it to disable first and then reboot your system.
Step 1: Go straight to Control Panel from Run Command.
Step 2: Go to the power option now.
Step 3: Click twice on to “Choose what the power button does” option.
Step 4: Go to change settings that are currently not available and press it twice.
Step 5: Simply remove the tick mark on the “Turn on Fast Startup (recommended) option.
Step 6: Save changes and restart your system.
2. Restart the Router or Modem
Step 1: Now, check your router and modem.
Step 2: Switch off your router and modem.
Step 3: Turn them on at least after 10 minutes.
Step 4: Now, see if you can use the internet connection on your device.
Step 5: If it doesn’t work, try using a different router or modem.
Step 6: If still new router/ modem doesn’t work, then your NIC is not working properly.
Step 7: Opt for factory restore in your Network card. Or else buy and install a new NIC into your PC.
3. Modify Your Network Adapter Settings
Step 1: In the search query box, enter “NCPA.CPL” and click ok
Step 2: Go to network connection and right-click on Ethernet adapter settings
Step 3: Go to its properties.
Step 4: Once the dialogue box opens, go to IPv4 (TCP/IPv4) and click it.
Step 5: Now let the system automatically set your IP address and DNS Server address.
Step 6: If the above step doesn’t work, then manually enter an IP address and other details.
Step 7: Enter IP address: 192.168.1.15
Step 8: In DNS server address enter 8.8.8.8
Step 9: In the alternate DNS server address enter 8.8.4.4
Step 10: Press OK and Apply to save changes and restart your PC.
[Read more: How to Fix When FireStick Remote Is Not Working?]
4. Resetting Your TCP/IP In PC Setting
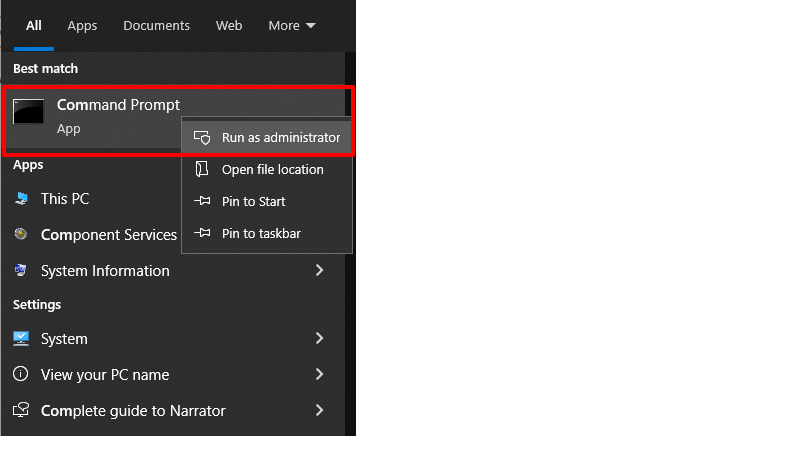
Step 1: In the search query box, type ‘Command Prompt’
Step 2: Run command prompt as an admin and give necessary permission if required.
Step 3: If it asks for any permission, grant the same.
Step 4: On the Command Prompt window, type NETSH WINSOCK and RESET NETSH INT IP RESET
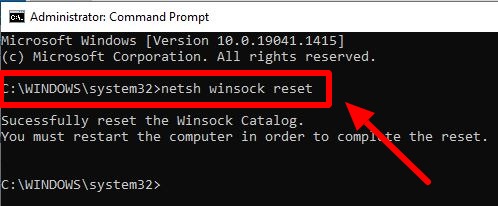
Step 5: Once both commands are successfully executed, you can restart your device to effect changes.
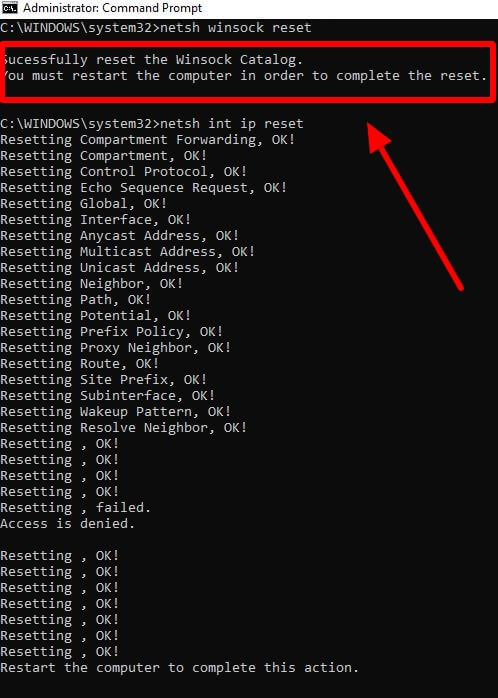
Step 6: Hopefully, you won’t see the Ethernet doesn’t have a valid IP configuration error this time.
5. Clear the network cache using Command Prompt
Step 1: Go to the command prompt as discussed above.
Step 2: Type ipconfig/ release, ipconfig/ renew, ipconfig/ flushdns
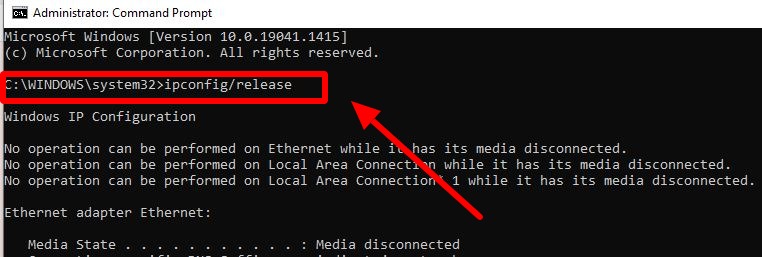
Step 3: When these commands are successfully executed, restart your PC.
Step 4: See if your problem has been resolved or not.
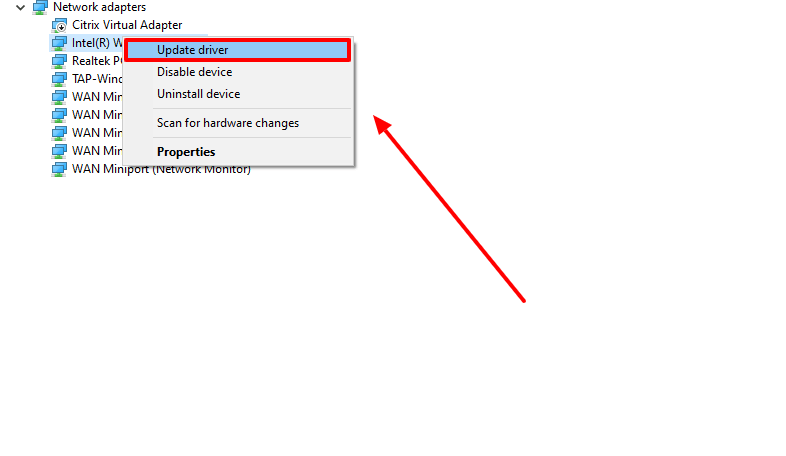
6. Reinstall or Update your Network Adapter Driver
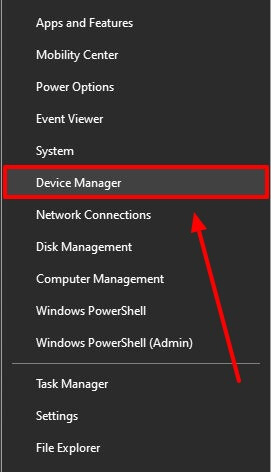
Step 1: Click on the search query box and enter hdwwiz.cpl-Press OK
Step 2: It will open your device manager. Select, Ethernet Card, in the Network adapter.
Step 3: In the network adapter, right-click to uninstall it.
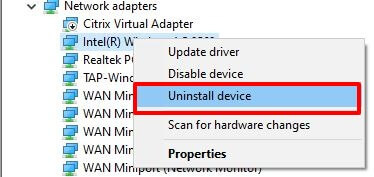
Step 4: You should now reinstall drivers from OEM and check if the internet is now working or not.
7. Give a MAC address to your network card for restoring Ethernet connectivity
Step 1: Go to command prompt
Step 2: Now type IPconfig /all
Step 3: Go to ‘Physical Address Value’ and copy the value.
Step 4: Now go to the network card/ router and enter the value into the field.
Step 5: Hopefully, you can now start using the internet.
8. Enable DHCP
Step 1: Open your router setting option
Step 2: Whenever you see the ‘ENABLE DHCP’ option, enable it.
Step 3; Set your PC’s network configuration to ‘automatically retrieve IP address’ is enabled.
Step 4: Restart your device.
9. Update all your firmware
Step 1: Find the firmware’s latest version online using another PC or mobile device.
Step 2: Now, update all your modem, router and other network devices using a USB cable or Bluetooth from OEM’s official website.
Step 3: Once all your firmware gets updated to their latest version, your internet connection will restore and you’ll stop seeing the error message.
[Read more: How To Fix pii_email_aef67573025b785e8ee2 Error Code?]
10. Disable your antivirus software
Step 1: Go to the antivirus software icon and double-click on it.
Step 2: If you notice ‘Disable’ anywhere on the window, click on it.
Step 3: Alternatively, go to the control panel – Programs and Features – and click uninstall on the antivirus option.
11. Disable IPv6
Step 1: Go to the networking sharing center.
Step 2: Click on the Change Adapter setting.
Step 3: Choose your network connectionà Disable TCP/ IPv6
Step 4: The network connection will now automatically change to TCP/ IPv4
Step 5: Restart your device and see if you can now easily use the internet on the device or not.
12. Perform a chkdsk scan
Step 1: Open Command Prompt as an admin directly from the search box.
Step 2: Type Chkdsk c: /f and press Enter to execute it.
Step 3: Enter Y to give permission.
Step 4: The chkdsk scan will now automatically be scheduled and run.
Step 5: Once the scan is complete, restart your PC.
Step 6: Your problem should be resolved by now.
13. Update your BIOS
Step 1: Get a compatible installer on your computer.
Step 2: Connect the same to your PC using a CD or USB stick.
Step 3: In order to execute the file for BIOS update your system needs to be connected to another PC having internet connectivity.
Step 4: Soon, your system will start updating its BIOS.
The Last word
It is clear now, that Ethernet doesn’t have a valid IP configuration is not a serious error. It mainly shows on the screen when your system fails to get connected to your ISP. You can try the above methods to get help on it. If at any stage, you feel that the above steps are complicated or too difficult, don’t hesitate to get in touch with a PC technician for help. You can also send in your queries and questions to us for more information on technical matters.